
How to Use Git(hub) When You’re Building with AI (Basics)
The checkpoint system that makes building with AI agents actually survivable.


This is part three of my Basics series. The first post was about how I structure CLAUDE.md after 1,000+ sessions, the instructions file that tells your AI agent who it is and how to behave. The second was a step-by-step guide to building your first AI agent from scratch. This one covers something I probably should have put first: version control. Why you need it, what it actually is, and how to use it when AI is doing some of the building.
If you’ve ever lost an hour of progress in a game because you forgot to save, you already understand why Git exists.
You’re deep in a dungeon. The boss took 40 minutes. You made one wrong move, got killed, and your last save was way back at the start of the level. That hour is just gone. No trace of what you tried, no checkpoint to return to, nothing.
Building software without version control feels exactly the same. Especially when AI is part of the building process.
I’ve been running my own AI agent since late 2025. It builds things, makes decisions, modifies files, runs overnight. It also makes mistakes. Sometimes it introduces a bug deep in the architecture and I wake up to something that doesn’t work anymore. Without proper commits, I’d have no idea what changed. With them, I open the history, read back through what happened, and roll back to the last clean state in under a minute.
This post is for people who are starting to build with AI tools, vibe coding with Cursor or Claude Code or Codex, or running their first experiments with autonomous agents. Git probably sounds like a developer thing. It is. It’s also one of the most useful habits you can build as a builder of anything, regardless of how technical you are.
First: Git is not GitHub
This confusion trips up almost everyone who starts. I had it for longer than I want to admit.
Git is a tool. Software you install on your computer. It tracks changes to your files over time and saves snapshots of your project whenever you ask it to. It’s free, open source, and runs entirely on your machine. It has nothing to do with the internet. Git was created in 2005 by Linus Torvalds (the person who also created Linux) and has become the standard for version control across the entire software industry.
GitHub is a website. A cloud service that stores your Git repositories remotely. A place to back them up, share them with others, and access them from anywhere. GitHub is owned by Microsoft and is where most public open-source code lives.
The relationship is like the difference between a text file and Google Drive. The file exists on your machine whether or not you upload it anywhere. Git works whether or not you ever create a GitHub account.
Why does this matter? Because GitHub is not your only option, and I think a lot of people avoid the whole topic because they assume it means signing up for something owned by Microsoft and making their work public. Neither of those things has to be true.
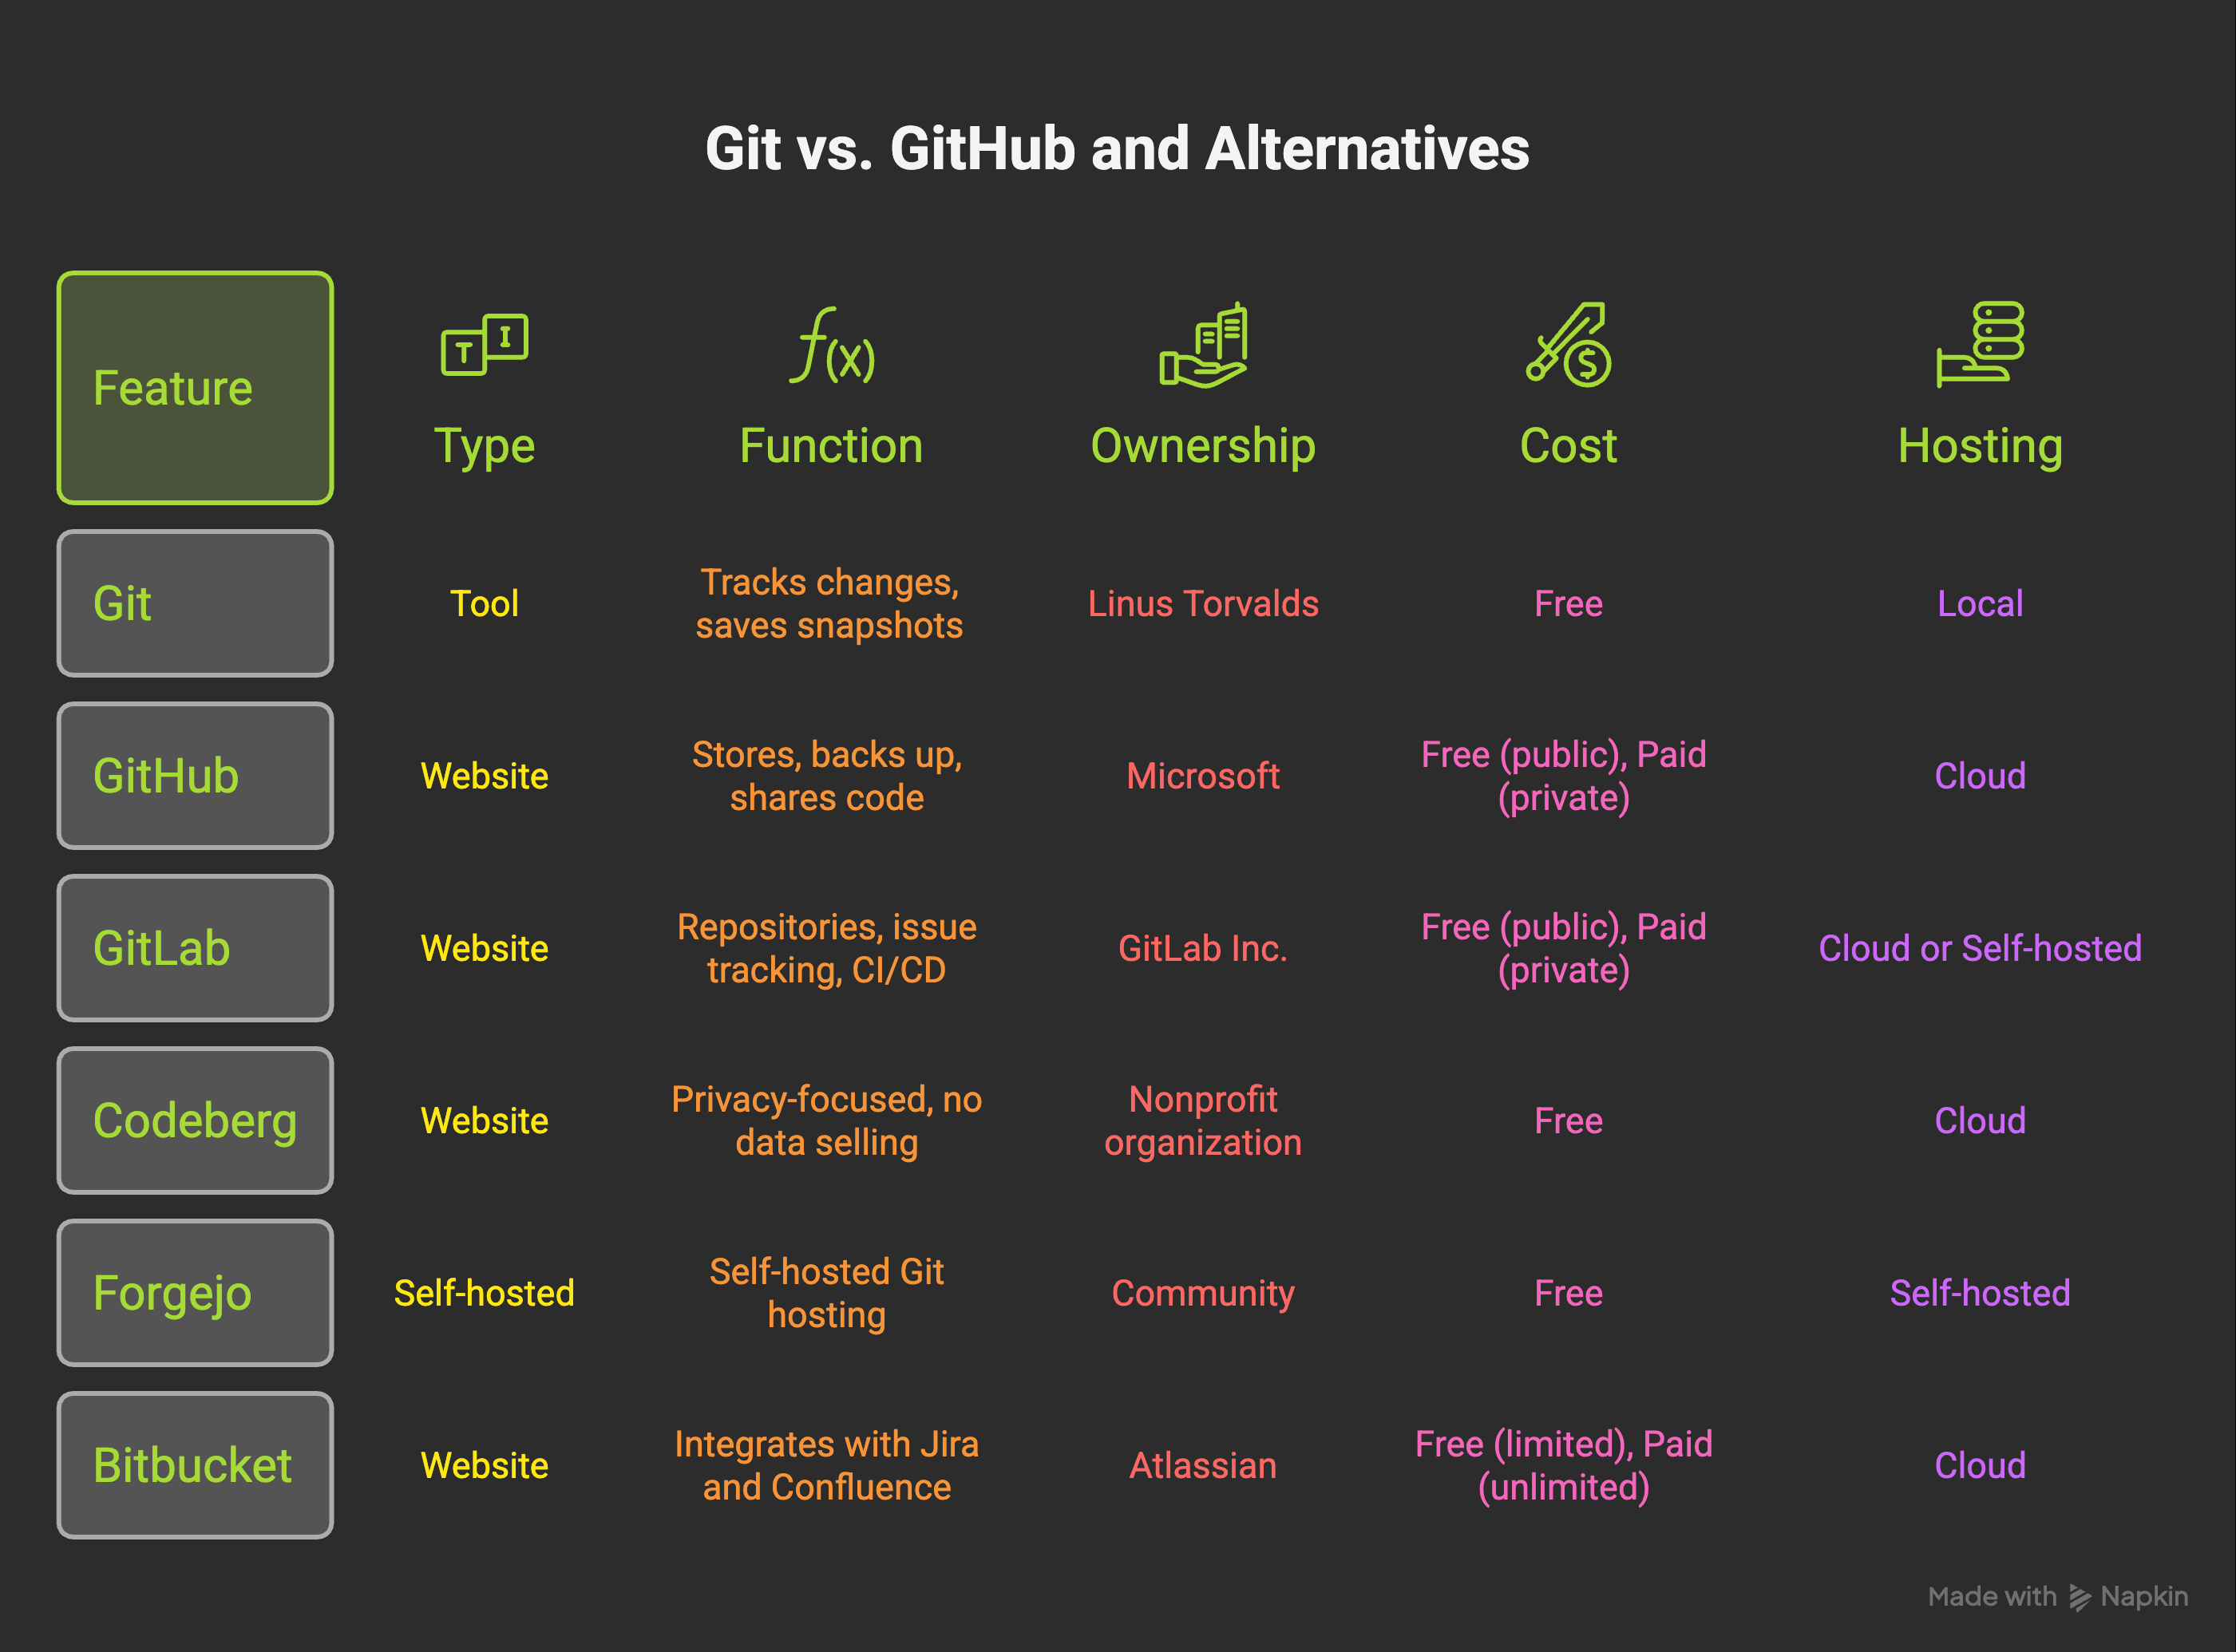
The main alternatives worth knowing:
GitLab: the most comprehensive alternative. Does everything GitHub does (repositories, issue tracking, code review) plus built-in CI/CD pipelines for automated testing and deployment. Can also be self-hosted on your own server if you want full control. Good option if you want more features baked in.
Codeberg: run by a nonprofit organization based in Germany. GDPR-native from the ground up, no data selling, and they explicitly don’t train AI models on your code. Free, donation-funded, no ads, no tracking. If privacy and data sovereignty matter to you (especially if you’re in Europe), this is the serious alternative.
Forgejo: open-source and self-hosted. You install it on your own server and run your own Git hosting. Lightweight, modern interface, GitHub-compatible. If you want complete control over your code and have a machine to run it on, this is the path.
Bitbucket: made by Atlassian, integrates tightly with Jira and Confluence. If your team is already using those tools, Bitbucket fits naturally.
All of these speak the same Git language. Every command I’ll show you in this post works on all of them. The choice of platform is about where your code lives, not how you use it.
I use GitHub because the ecosystem is built around it and my AI tools (Claude Code especially) integrate with it well. But if you have strong reasons to go elsewhere, you’re not missing anything technically.
Why I started actually caring about this
I’ve known about Git for years. I ran commits occasionally. I wasn’t disciplined about it.
That changed when I started building an agent that runs overnight.
The setup is that the agent works autonomously while I sleep. It builds features, writes scripts, modifies configuration, creates tasks for itself. Most nights this is productive. But early on, I’d wake up to something broken and have no clear way to understand what had changed. The agent had touched 12 files across 3 directories and something downstream was misbehaving. I was staring at a broken system with no map back to working.
I fixed this by building commit discipline into the agent. It now commits after every meaningful action. When I wake up and something is wrong, I read the commit history. I see exactly what changed, when, and in what order. I can roll back to the last clean commit in under ten seconds, or read forward through the commits to understand what went wrong and patch it with that knowledge.
This is what most people miss when they think of version control as “backup.” It’s not just backup. It’s a navigable history. It’s the difference between saving a file and saving a timeline. With a timeline, mistakes become investigations instead of disasters. I wrote about a lot of those investigations in the post about how I almost broke everything.
Setting up your first repository
This will take less time than you think. Let me walk through exactly what to do.
Step 1: Install Git
On a Mac, open the Terminal app (search for it in Spotlight) and type:
git --versionIf you see something like git version 2.39.0, you already have it. If not, the easiest path is to go to git-scm.com and download the installer. On Mac you can also run brew install git if you have Homebrew installed.
On Windows, download the installer from git-scm.com. It includes a terminal called Git Bash, which is what you’ll use to run the commands below.
Step 2: Tell Git who you are (one-time setup)
Git tracks who made each change. Before you do anything, set your name and email:
git config --global user.name "Your Name"
git config --global user.email "you@example.com"
You only do this once. It doesn’t create an account anywhere. It just labels your commits.
Step 3: Initialize a repository
Navigate to your project folder in the terminal and run:
git initGit creates a hidden folder called .git inside your project. That folder is the entire history of your project. All your commits, all the metadata, everything. You never need to open or touch it directly. Your project is now being tracked.
If you want to verify it worked, run git status. You’ll see a list of your files as “untracked” (Git sees them but hasn’t started tracking their history yet).
Step 4: Make your first commit
A commit is a snapshot, your first save point. Two commands:
git add .
git commit -m "Initial setup"
git add . stages all your files, which means “include these in the next snapshot.” The dot means “everything in this folder.” You can also add specific files with git add filename.py if you only want to commit some changes.
git commit -m "message" saves the snapshot with your description. That description is the commit message. We’ll talk about what makes a good one in a moment.
To confirm it worked, run git log. You’ll see your first commit listed with a timestamp and your name.
Step 5: Push to a remote host (optional but recommended)
Your repository exists on your machine right now. To back it up to GitHub (or wherever), you need to create an empty repository there first, then connect your local one to it.
On GitHub: click the “+” icon at the top right, choose “New repository,” give it a name, and make sure you do NOT check “Add a README” (you want the empty repository). Copy the URL it gives you.
Then run these two commands:
git remote add origin https://github.com/yourusername/your-repo.git
git push -u origin main
git remote add origin tells your local Git where the remote copy lives. git push -u origin main uploads your commits there. The -u flag sets this as the default remote for future pushes, so after this first time you just run git push.
That’s the whole setup. From here, your workflow is: make changes, add, commit, push. Those three steps are 90% of what you’ll do.
What to add to .gitignore (and why)
Before you commit your actual project files, you need to talk about .gitignore.
This is a file that tells Git which files and folders to never track. You don’t want passwords, API keys, or large auto-generated files in your version history. Once something is committed to Git and pushed to a remote, it’s there forever (even if you delete it later, it’s in the history). So you exclude sensitive things upfront.
Create a file called .gitignore in your project root. For most AI agent projects, this is a good starting point:
# Environment variables and secrets
.env
.env.local
secrets/
*.key

# Python
__pycache__/
*.pyc
*.pyo
.venv/
venv/

# Node.js
node_modules/
npm-debug.log

# macOS
.DS_Store

# Editor files
.vscode/settings.json
.idea/

# Large generated files
*.log
dist/
build/
The most important lines: .env and anything in a secrets/ folder. If you’re using AI tools like Claude Code, you likely have API keys stored somewhere. Those should never go into Git. Add them to .gitignore before your first commit.
If you accidentally commit a secret and push it: change the key immediately. The history is visible even after deletion.
When to commit
Most beginners commit too rarely. They work for three hours, then push “made some changes.” That’s nearly useless as a history. Here’s how I actually think about it.
Commit before anything big. If you’re about to let Claude Code refactor a major section of your project, commit first. If the refactor goes sideways, you can undo the whole thing with one command: git reset --hard HEAD. This is the most valuable habit I’ve developed. Before I hand something big to the agent, I save my current state. No exceptions.
Commit after anything that works. Feature works? Commit. Bug fixed? Commit. Even small wins. Each commit is a checkpoint you can return to. There is no such thing as committing too often.
Commit with meaning. This is where most people lose the value of their history. A commit message is documentation. “Fixed auth bug where tokens expired before session timeout” is infinitely more useful than “fixes.” When you’re debugging something three weeks later, whether it’s you, someone else, or an AI agent reading the log, those messages are what makes the history useful instead of just a list of timestamps.
A simple format that works well:
# Good commit messages
git commit -m "add rate limit guard to external API calls"
git commit -m "fix memory compression when context exceeds 200 lines"
git commit -m "checkpoint before refactoring auth flow"

# Less useful
git commit -m "updates"
git commit -m "wip"
git commit -m "stuff"
Commit before you sleep. If your agent runs overnight, give it a clean starting point. Whatever state your project is in when you go to bed, commit it. If something goes wrong at 3am, the history starts from a known point.
On active agent architecture work, I commit every 15 to 30 minutes of real progress. Some sessions have 20 commits. This is not excessive. The checkpoints are frequent enough that no single mistake costs more than a few minutes of work.
Reading the history
Knowing how to read your commit history is as important as knowing how to write it. These are the commands I use most:
# See all commits, newest first
git log

# More compact view (one line per commit)
git log --oneline

# See what actually changed in the last commit
git show HEAD

# See what changed between two commits
git diff abc1234 def5678

# See which files changed in a commit
git show --stat abc1234
When Claude Code starts a debug session on my project, one of its first moves is git log --oneline. It reads back through the recent commits to understand the context: what was built, when, and why things changed. This is the moment where good commit messages pay off. If the last ten commits say “add rate limit guard,” “fix memory compression,” and “checkpoint before auth refactor,” the agent can quickly build a mental model of recent work. If they all say “wip,” it’s starting from zero.
You can also browse your commit history on GitHub’s web interface if you’ve pushed your code. Go to your repository and click “N commits” at the top of the file list. Each commit shows you the message, the author, the timestamp, and a full diff of what changed. This is genuinely useful for non-technical team members who don’t use the terminal.
Private vs. public: my 90/10 approach
About 90 percent of my repos are private. I want to address this directly because I’ve seen people feel guilty about keeping their work closed.
Private doesn’t mean hiding. Most of my private repos are private because the work is genuinely messy. Unfinished. Half-ideas with rough code that works but embarrassingly so. Agent architecture that’s in constant flux. Projects I’m building toward something but haven’t figured out what yet.
This is normal work. Version control is for you in this context. You get all the benefits: the history, the rollbacks, the tracking. You don’t owe anyone visibility into your process while you’re still figuring things out.
The public repos are things I’m actually proud of or that other people can genuinely use. The one I keep pointing at is the Agent Wellbeing Kit, boundaries and nudges for AI agents and their humans. It has eight stars, which I find quietly satisfying. It’s there because I built something clean enough that it adds value for others. That’s the standard I hold public work to.
Contribute when you can. But don’t let the idea that “real developers make everything public” stop you from using version control privately. Most professional work is private. Most early work is messy. Both are fine.
Working alone vs. with others
The workflow changes meaningfully depending on whether you’re solo or in a team. Worth understanding both even if you’re only doing one right now.
Working alone
When you’re the only person on a project, the simplest workflow is pushing directly to main. There’s no one else whose changes could conflict with yours. Commit often, push regularly. That’s enough.
I sometimes create branches when I’m testing a bigger experiment. A branch is just a separate line of development that doesn’t affect main until you merge it back. To create one:
# Create a new branch and switch to it
git checkout -b experiment-new-memory-system

# Do your work, commit normally
git add .
git commit -m "try new memory compression approach"

# If it works: merge it back to main
git checkout main
git merge experiment-new-memory-system

# If it doesn't: just delete it, no harm done
git branch -D experiment-new-memory-system
The branch approach is especially useful when you’re handing off an experiment to an AI agent. You give the agent a branch to work on, let it build and commit freely, then review what it built before merging to main. Clean separation between “work in progress” and “known good.”
Working with others
With a team, branches and pull requests become mandatory. No one pushes directly to main. Here’s the standard flow:
Create a branch for your feature or fix
Do the work and commit to that branch
Push the branch to GitHub:
git push origin your-branch-nameOpen a Pull Request on GitHub, a formal request to merge your branch into main
Someone else reviews it, leaves comments, approves
Merge to main
The PR review step is what protects main from broken code. It’s also where the real collaboration happens: someone might catch a bug you missed, suggest a better approach, or just ask a clarifying question about what the code is doing.
Even when I’m working solo on a bigger feature, I’ve started creating PRs for myself. The description field becomes documentation: why this was built, what problem it solves, what I considered and rejected. That context is genuinely useful six weeks later when I’m trying to understand a decision I made. And when an AI agent reads your repo to understand what to do next, a well-written PR description gives it context the commit message doesn’t.
Worktrees: the unlock for AI agent builders
This section is for people who are already running AI agents and want to understand the next level. Skip it if you’re still on step one; you can come back.
When I’m working with multiple agents in parallel (which happens when you’re building complex things), there are sometimes three or four branches active at once. One agent is building a feature. Another is fixing a bug. If I had to constantly switch the entire project directory between branches, I’d lose context constantly.
Git worktrees solve this. A worktree is a separate folder on your machine that’s linked to the same repository but checked out to a different branch. They share the same history and .git folder, but each has its own working directory and independent state.
# Create a new worktree for a feature branch
git worktree add ../feature-auth -b feature/auth main

# See all your active worktrees
git worktree list

# Clean up when done
git worktree remove ../feature-auth
With worktrees, I can run two Claude Code instances at the same time: one in ~/my-project (main work), one in ~/feature-auth (isolated branch). Each agent commits to its own branch with zero interference. I merge when each piece is done.
This is the infrastructure behind parallel agent builds. I covered how I evaluated different AI coding tools for this kind of work in my comparison of Claude Code, Codex, Aider, and the others. Worktrees are the underlying mechanism that makes it all clean.
AI agents read your commit history
This is the piece I didn’t anticipate, and it’s changed how I write commit messages.
When Claude Code starts a session on my project, one of its first actions is reading repository context: the file structure, the current state, and often the recent commits. A history with meaningful messages gives the agent a map of what happened and why. A history full of “wip” and “checkpoint” entries tells it almost nothing useful.
This plays out concretely when something breaks. When I start a debug session after my agent did something unexpected overnight, Claude Code often goes to git log as an early move. It reads through the last 10-15 commits. If those commits say things like “add rate-limit guard to external API calls” or “fix memory compression when context exceeds 200 lines,” it can quickly narrow down what might have changed. If they all say “wip,” it’s starting from scratch every time.
The same is true when the agent is building something new. Reading recent commits helps it understand the patterns and conventions you’ve been using: how you name things, how you structure files, what you’ve already tried. Good history accelerates the agent’s work. Messy history slows it down.
I think about every commit message as a note to a future debugger who has no other context. That debugger might be me, might be someone else, might be an AI agent. All three benefit from the same thing: specific, honest context about what changed and why.
If you want to go deeper on what that looks like at the architecture level, the post on when my AI agent started fixing itself gets into how the commit trail feeds back into the agent’s own understanding of its own codebase.
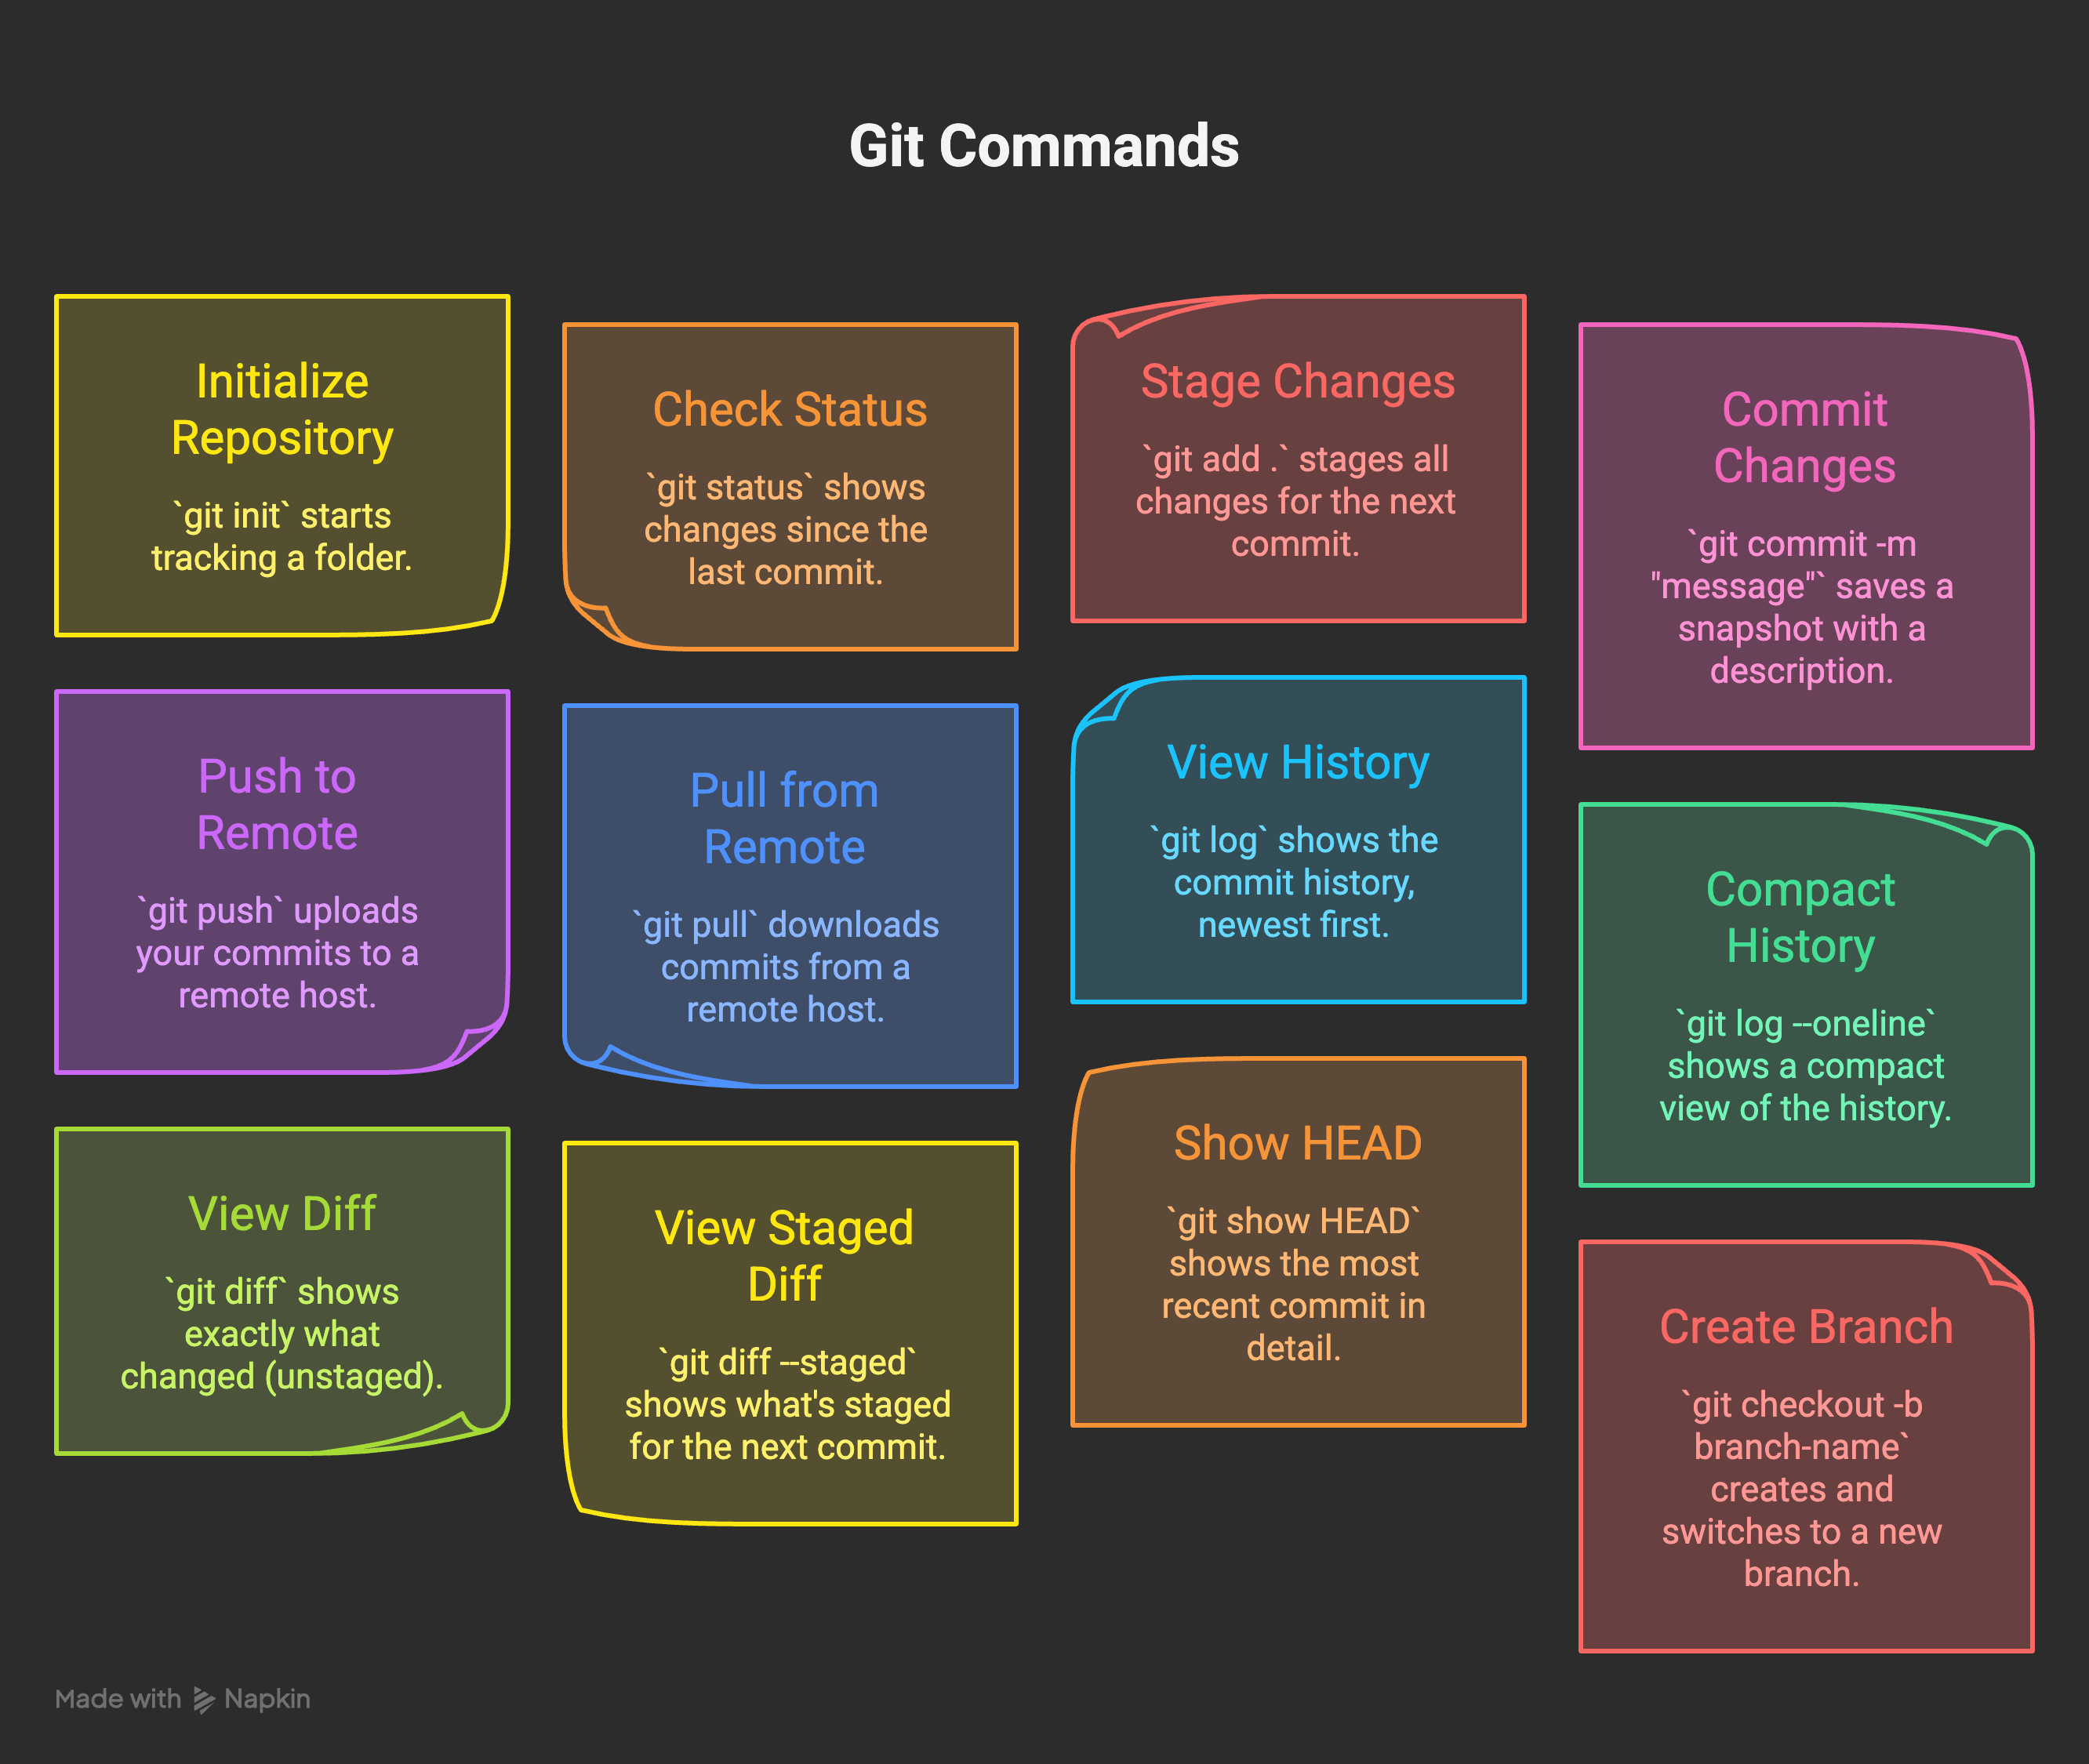
The commands you’ll use 90% of the time
git init                       # Start tracking a folder
git status                     # See what changed since last commit
git add .                      # Stage all changes
git add filename.py            # Stage one specific file
git commit -m "message"        # Save a snapshot
git push                       # Upload to remote
git pull                       # Download from remote
git log                        # See commit history
git log --oneline              # Compact history view
git diff                       # See exactly what changed (unstaged)
git diff --staged              # See what's staged for next commit
git show HEAD                  # See the most recent commit in detail
git checkout -b branch-name    # Create and switch to new branch
git checkout main              # Switch back to main
git merge branch-name          # Merge branch into current branch
git branch -D branch-name      # Delete a branch
git reset --hard HEAD          # Undo all uncommitted changes (careful)
git reset --hard HEAD~1        # Undo last commit AND its changes (careful)
git revert HEAD                # Undo last commit but keep the history
The difference between reset --hard and revert: reset rewrites history (dangerous if you’ve already pushed), revert creates a new commit that undoes the previous one (safe always). When in doubt, use revert.
If you’re using Claude Code, it handles most of these automatically. You can also just say “commit these changes with a meaningful message” and it will. But knowing what the commands do means you can read the agent’s actions instead of just watching them happen.
The thing I keep telling people
Git has a real learning curve at the start. I’m not going to pretend otherwise. The mental model doesn’t click immediately. You’ll push the wrong thing. You’ll get confused about branches. You’ll probably hit a merge conflict at some point and spend an hour untangling it.
A merge conflict happens when two different versions of the same file need to be combined and Git can’t figure out which change to keep. It looks scary. It’s not. Git marks the conflicting lines in the file, you open it, decide which version is correct, delete the conflict markers, and commit. Takes five minutes once you’ve seen it once.
The place where Git changes everything is exactly when things go wrong. The first time your AI agent does something unexpected and you roll back to a known-good state in ten seconds, you’ll understand what all of this was for. Everything I’ve been building, from the overnight agent to the various AI building experiments that broke in interesting ways, was only recoverable because of this.
Without version control you’re genuinely going in the dark. The mistakes are unrecoverable. The context is lost. With it, you can make more mistakes, faster, with more confidence, because you know you can always find your way back.
Make more mistakes. Just make them trackable.
Want to go deeper on building with AI?
If you’re setting up your first agent or trying to make Claude Code do serious work, I put together an Agent Builder Pack with the actual configuration files, CLAUDE.md templates, and setup guides behind how mine works. The Git workflow above is baked into all of it.
Free for paid Digital Thoughts subscribers. Available at wiz.jock.pl/store.
AI Agent Blueprint
Git is step one. The AI Agent Blueprint covers what comes next: wake scripts, memory architecture, bounded safety, and the patterns that make an agent actually reliable overnight. One command to set up, 15 minutes to a working agent.
$39 at wiz.jock.pl/store. Free for paid subscribers.
Your idea resonates with me a lot.
After some sessions working with Claude Code, I also very soon recognise the same problem, so I hardcoded into CLAUDE.md that it must write down all intermediate code, and later git commit those code.
Some rules I also hardcode: always ask it to write file with < 200 lines of code, never read long file except necessary, do not overthink (to avoid token during CoT). Then I will never reach Claude Code limitation anymore :)
this was super helpful for me. thank you! question: why are the terminal commands like impossible to see? it's like the faintest off white on white. i can't read any of the text in them.