
How to Build Your First AI Agent (Basics)
Six months of mistakes, a real walk-through, and everything I wish someone had told me before I started.


I’ve been building my own AI agent since October. Every mistake you can make on a first build, I’ve made. Some of them twice.
A few days ago I asked my readers what I should write about for beginners. The answers lined up surprisingly clean. Almost everyone asked for the same thing in different words: the real stuff. What actually goes wrong. What to do on day one. How to start without feeling lost.
So here it is. More structured than my usual posts, because this one is for people starting from zero. If you already have an agent running, most of this will still be useful, but the mental model is written for someone who’s never done this before.
One thing before we start. Mistakes aren’t failure. For early adopters, they ARE the job. Everyone building in this space is hitting the same walls at the same time, because nobody has the map yet. You’re not doing it wrong. You’re doing it at all, which is the hard part.
1. What is an AI agent, really (and why it’s different from automation)
My starting point wasn’t AI. It was Zapier.
I’ve been building classical automations for years. Zapier, n8n, make.com, custom scripts, connectors glued together with duct tape. When I started thinking about building my own agent back in October, my first instinct was to do exactly what I knew: chain tools together with a workflow builder and call it a day. I actually started that way.
Honestly, for a lot of people reading this, that’s still a perfectly reasonable starting point. If you’ve never built any kind of automation before, go make three Zaps this week. Connect your calendar to Notion. Send yourself a Slack message when an RSS feed updates. Do something small and stupid. Feel how a trigger leads to an action which leads to a result. Those three concepts are the spine of everything that comes next.
The reason I didn’t stop at Zapier is the difference between an automation and an agent. An automation is deterministic. Same input, same steps, same output. You define every branch in advance. It’s predictable, which is why it’s trustworthy for production work.
An agent has wiggle room. You give it a goal and a set of tools, and it decides how to use them. Given the same input twice, it might do slightly different things. It might also do something you didn’t anticipate, because the whole point is that it can improvise. Although that sounds risky (and sometimes it is), it’s also the thing that makes an agent valuable. If the tool it expected is broken, it can find a workaround or build one. A classic automation just stops.
Neither one is better. They solve different problems. And honestly, most production “agents” out there are closer to classic automations with a language model glued to the top. That’s fine. It works. What matters is you know which one you’re building, because the failure modes are completely different.
2. Three questions I had to answer the long way around
Before we touch any code, I want to borrow a framing from Zachary Wefel , who left one of the best comments on my original note. He pointed out that writers in tech tend to skip past the most basic things about how software actually exists in the world, because people around them already assume those things. He gave three questions as an example:
Where does the agent live? How do you see it? How do you talk to it?
I had to answer all three for myself, and I took the long way around on all of them. Here’s what I learned.
Where does it live?
Mine lives on a Mac Mini next to the main TV in my living room. Before that it lived on my personal MacBook for the first few months, which was fine except I needed my laptop to be on all the time for anything to run. Eventually that got annoying enough that I moved it to its own dedicated machine. That’s not a day-one problem.
For your first agent, the answer is: it lives on your laptop. That’s it. Your laptop is enough. An agent is just software. It lives wherever that software runs. That can be your laptop, a cheap dedicated computer in your closet, a rented cloud server, or a Raspberry Pi. Don’t complicate this before you have anything running.
How do you see it?
You mostly won’t. There’s usually no dashboard, no slick interface, no moving dials. This confuses a lot of beginners, because we’re used to software having a face.
You “see” an agent through what it produces. Files it writes. Messages it sends you. Things it prints in the terminal. Tasks it finishes or fails at. You can build a dashboard later if you want one (I eventually did), but on day one the agent is invisible except for its outputs.
How do you talk to it?
My agent has four channels now: email, Discord, iMessage, and a task app I built for it called WizBoard. That’s way more than a beginner needs. You need one channel, and whatever you already use for anything else is a fine pick.
The easiest first channel is the terminal on your own laptop. You type a message. It responds. That’s the whole interface. It looks ugly. It’s also the most powerful setup you can have for learning, because every other interface is just a fancy wrapper around that same loop.
3. What you need to begin
Before any code, before any chat, here’s the kit.
3.1. A machine
Your laptop is fine. Any laptop. Mac, Linux, Windows, all fine. If it can run a browser and a text editor, it can run your first agent. Don’t buy anything new.
Later on, if you want your agent to keep working while you sleep or while you’re away from your desk, you’ll eventually graduate to something that stays on. I wrote about what that migration looked like for me, and it wasn’t hard. Although it matters eventually, it’s a month-three problem, not a day-one problem.
3.2. A subscription (or API access)
Let me be direct about this part, because I don’t see it spelled out often enough in beginner guides.
Free tiers aren’t enough. They cap you out fast, and you’ll spend your first afternoon hitting rate limits instead of learning. This is the wrong place to save money.
A $20 per month tier is your floor. Claude Pro, ChatGPT Plus, or the equivalent from whichever provider you pick. That tier is genuinely enough to build a simple first agent and get it working. You won’t love it forever, but it’s more than enough to start.
Power users run more than that. I pay for multiple subscriptions and for API usage on top. My bill isn’t small. That’s a months-from-now problem. Don’t worry about it yet.
Like, think of the $20 as a gym membership. It’s the cost of learning the skill. And honestly, it’s one of the cheapest upgrades to your toolkit you’ll ever make, so don’t flinch at it.
3.3. A harness (the tool you actually work with)
“Harness” is the word I use for the tool you sit in front of while building. There are four honest options, and all of them work:
Claude Code. A terminal-based tool from Anthropic. This is what I use most days. Deep file access, built for serious building. Power user territory, but approachable.
Claude Cowork. Also from Anthropic. A built-in cloud app that runs Claude in an agent loop without you ever touching a terminal. If the word “terminal” already makes you nervous, this is probably where you should start. It’s genuinely good enough to build your first real agent in, and you can always graduate to Claude Code later.
Codex (or the equivalent from another provider). Same category as Claude Code, different flavor.
A plain AI chat like Claude.ai or ChatGPT in your browser. Yes, you can genuinely start here. You’ll be copy-pasting more, but it works completely.
Pick one. Don’t spend a week comparison-shopping. The differences don’t matter until you’ve actually built something and know what you need. I wrote a longer piece on what’s actually worth learning from a harness like Claude Code if you want a deeper take. But for today, pick one and move on.
3.4. A folder (this is THE architecture)
Here’s the mental model that took me three months to see clearly. If you take it seriously, it’ll save you those three months.
The architecture of your AI agent IS its folder structure.
That’s it. There is no hidden magic layer. Every functional piece of an AI agent lives as a file in a folder on your computer. When someone online says “the agent has tools,” what they really mean is: there are scripts in a folder that the agent knows how to run. When someone says “the agent has memory,” they mean: there are markdown files it reads at the start of each session. When someone says “the agent has an instruction set,” they mean: there’s a file called something like CLAUDE.md or agents.md that tells it who it is and what the rules are.
It’s all files. That’s the whole trick. Once you see the folder as the architecture, the mystery goes away.
Here’s what a beginner’s agent folder looks like in practice:
my-agent/
├── CLAUDE.md              ← instructions (the brain)
├── memory/
│   └── notes.md           ← what the agent remembers
├── projects/
│   └── morning-email/
│       ├── fetch-email    ← the part that pulls your email
│       └── prompt.md      ← how you want it summarized
├── scripts/               ← small helper scripts
└── secrets/               ← API keys, passwords (keep this safe)
Read that tree slowly. Every concept maps cleanly to a file or folder:
Instructions live in
CLAUDE.mdoragents.mddepending on your harness.Memory lives in markdown files inside
memory/.Tools (what the agent can do) are scripts inside
scripts/or inside each project folder.Projects live as subfolders under
projects/.Credentials (passwords, API keys) live in a protected
secrets/folder.
When you look at an AI agent this way, it stops being a mysterious entity and starts being something very familiar: a folder with text files in it. I wrote about how I structure the CLAUDE.md file itself after more than a thousand sessions, and that file is the single most important thing you will own. For now, just sit with the idea: the whole agent is a folder.
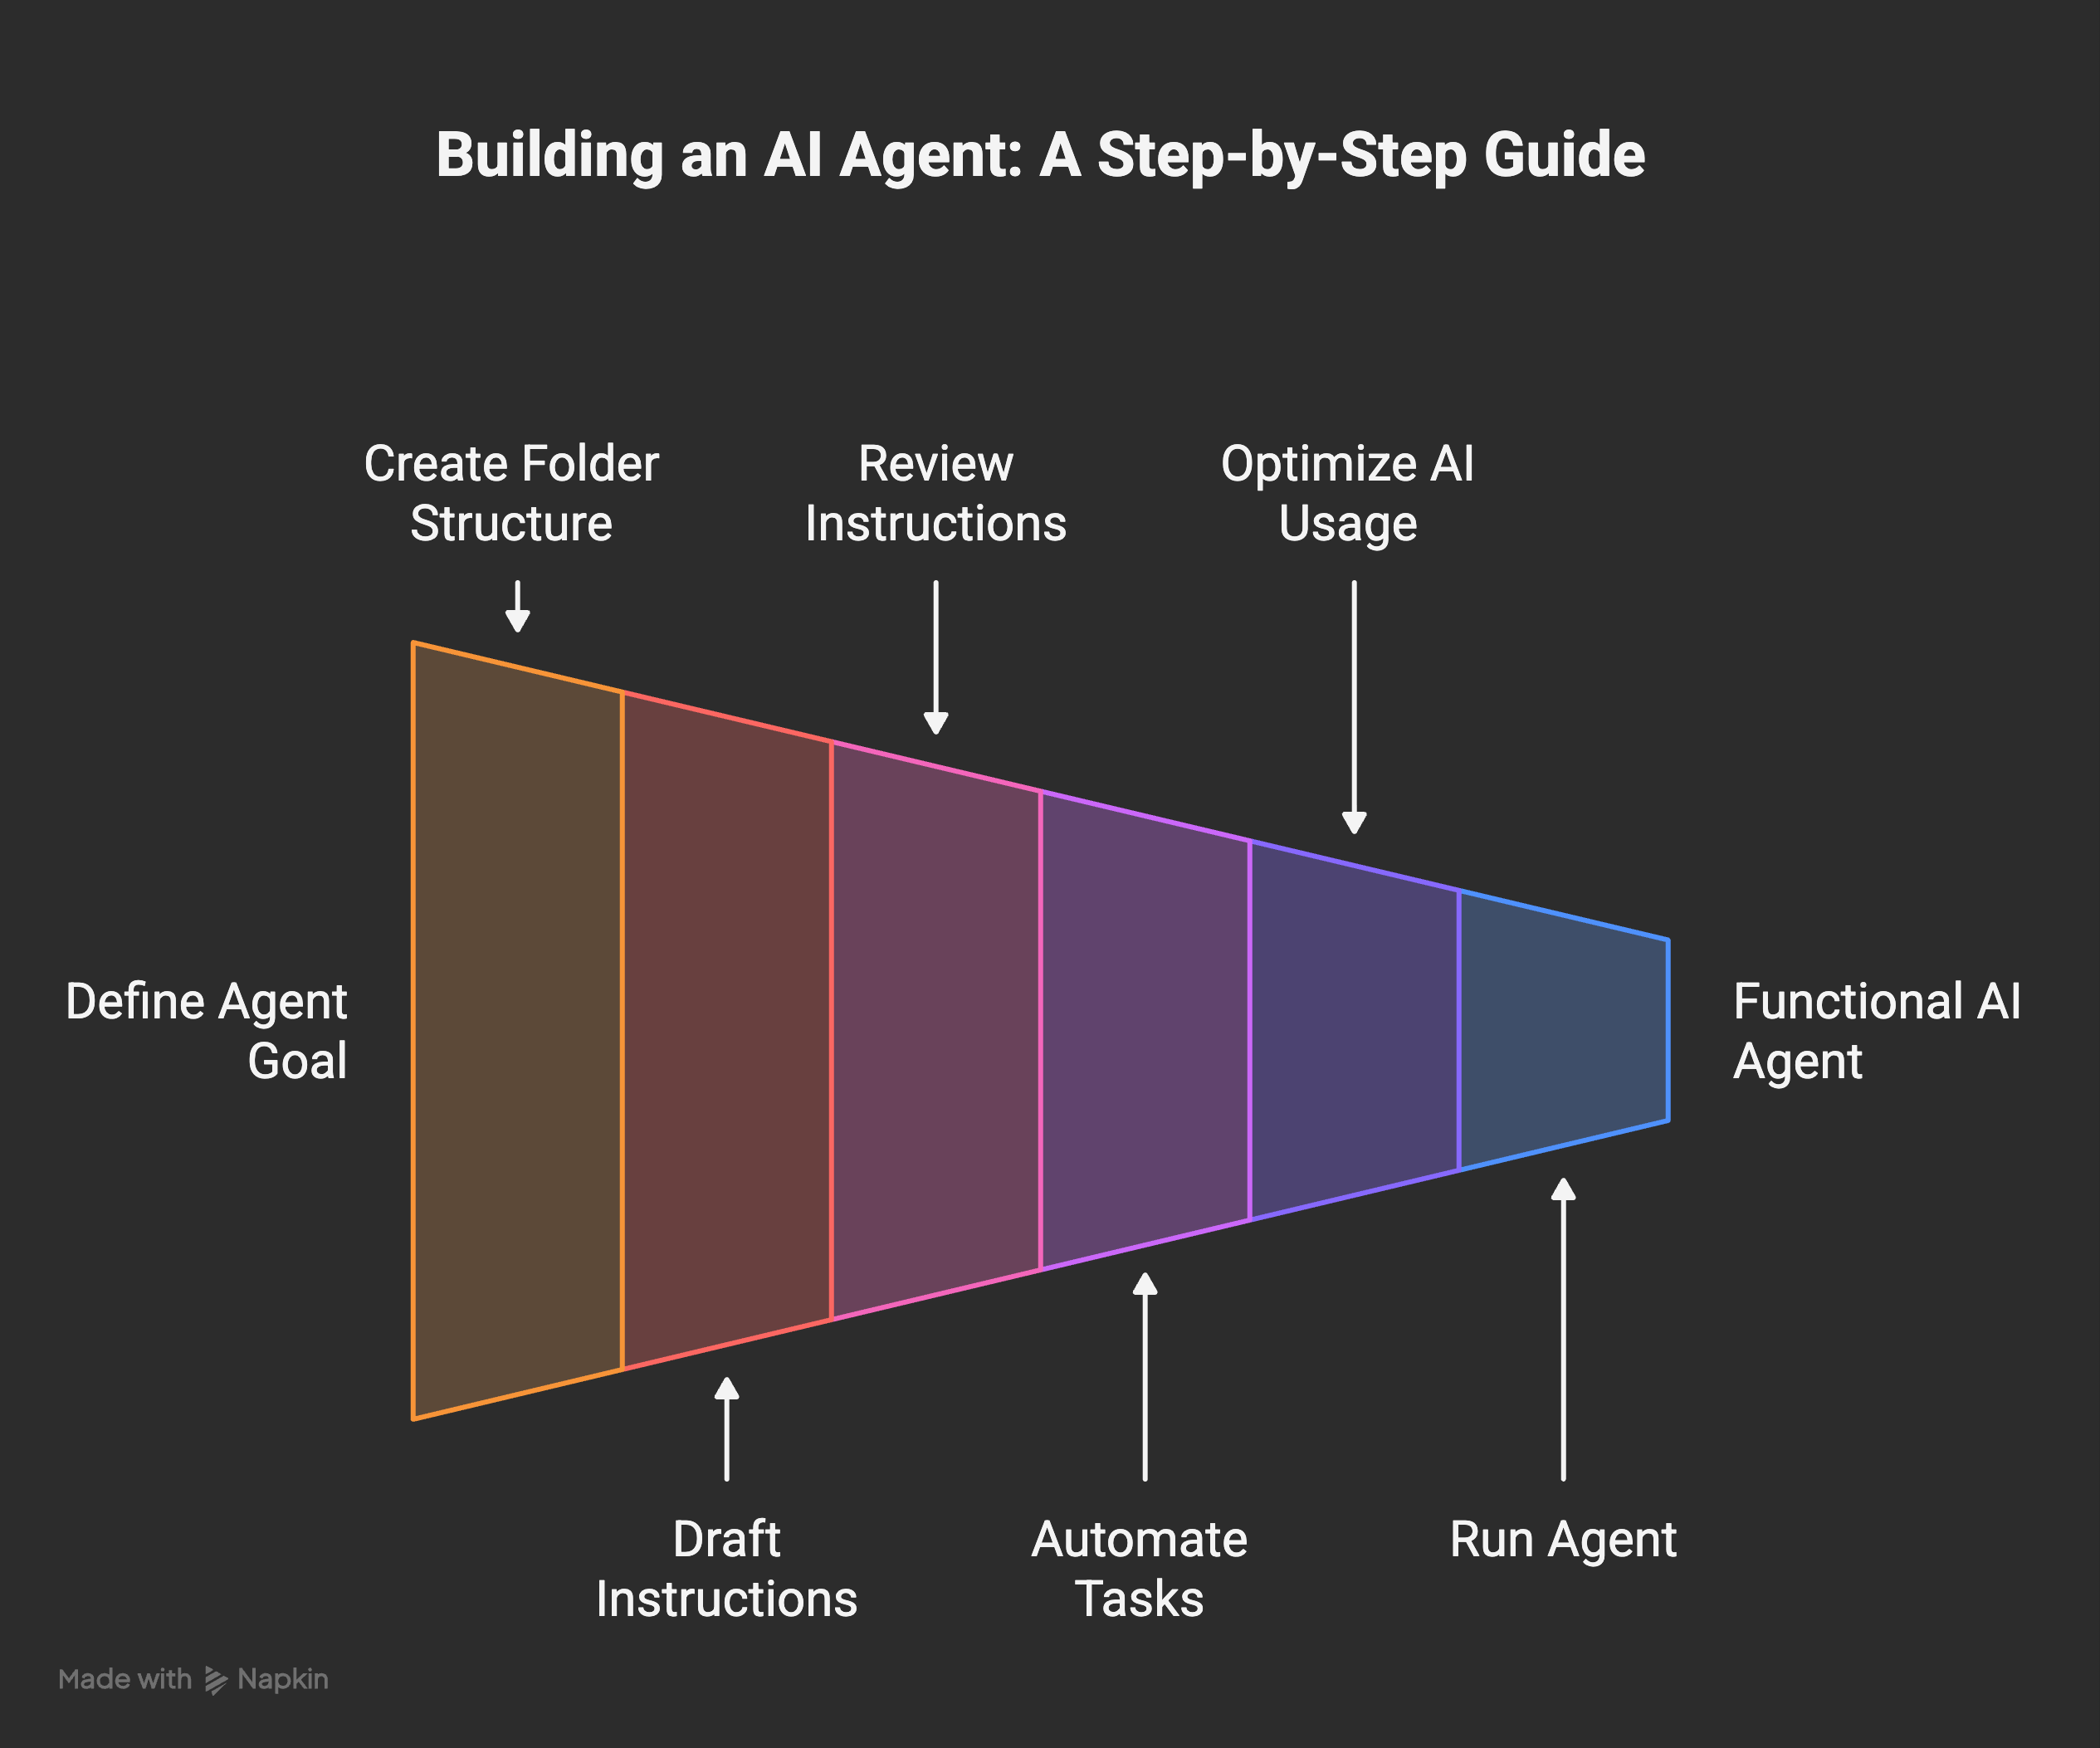
4. Build your first agent, step by step
Enough theory. I want you to finish this post with a real working agent, not just an understanding. I’m going to walk through the exact project I recommend for a first build: an agent that reads your overnight email and writes you a one-paragraph morning summary.
Free. Subscribe and the next one shows up in your inbox on its own.
I picked this one on purpose. It’s small enough to finish in an afternoon. It’s real enough that you’ll actually use it tomorrow. And it’ll make you hit most of the real challenges in building any agent: authentication, permissions, context, prompt design, error handling. You’ll learn more from building this than from reading any number of articles about it.
Step 1. Decide what you want (fifteen minutes, no code)
Open your chat tool of choice. Not to write code yet. Just to think out loud. Describe your morning:
Every morning I open my email. I scan 40 messages. I figure out which three actually matter. I want a one-paragraph summary of the important stuff before my coffee is done.
That’s your spec. Keep it this short. If you can’t explain what you want in one honest paragraph, you don’t understand what you want yet, and the agent isn’t going to save you from that. Better to figure it out before you write a line of code.
Step 2. Create the folder (five minutes)
Make an empty folder on your computer. Call it my-agent. Inside it, create the skeleton:
my-agent/
├── CLAUDE.md
├── memory/
├── projects/morning-email/
├── scripts/
└── secrets/
Empty folders are fine. We’ll fill them as we go. The only reason to make them now is so your agent has a place to put things.
Step 3. Let the AI draft your instructions file (ten minutes)
If you’re using Claude Code, there’s an even shorter way to start. From inside your empty my-agent folder, run the /init command. Claude Code looks around, figures out what it’s dealing with, and drops an initial CLAUDE.md in there for you. That’s your starting point. One command, done.
If you’re in a different harness or a plain chat, type something like:
I want to build an AI agent whose first job is to read my email inbox every morning and write me a one-paragraph summary of what matters. Draft a CLAUDE.md instructions file for it. Keep it under 50 lines. Don’t assume anything about my setup.
Either way, you’ll end up with a file called CLAUDE.md inside your folder. That’s the starting version. It will be rough. That’s fine.
Step 4. READ the CLAUDE.md (this is the most important step in this entire post)
I’m not joking. This one step is worth more than the other seven combined.
Open the file the AI just wrote. Read every line. Ask yourself:
Does this actually describe what I want?
Are there weird assumptions baked in that I didn’t ask for?
Does the voice sound like me, or like corporate blog filler?
Is there anything in here that surprises me?
Edit it until it reads like you wrote it. Remove anything you don’t understand. Add anything the model forgot. This file is the brain of your agent. If it’s wrong, every single thing downstream of it will also be wrong, and you’ll spend hours later chasing a ghost that started right here on day one. More on why in the mistakes section.
Step 5. Tell it what to automate (around thirty minutes)
Now the actual building. Here’s the key thing to understand, and it’s the reason I’m not writing out a bunch of code for you to copy: you don’t have to. You can just describe what you want in plain language, and the harness will figure out the rest.
Back to your harness. Say something like:
I want the first thing in projects/morning-email to read my email inbox, pull the last 12 hours of unread messages, and hand them off to be summarized. The end result should be a one-paragraph summary of what actually matters. Figure out the best way to do this on my setup and walk me through it step by step.
That’s it. That’s the entire prompt. No code, no jargon, no pretending you know what a shell script is.
A good harness, which is all of them these days, will then ask you follow-up questions. What email provider do you use? Mac, Windows, or Linux? Do you already have API credentials? Do you want this to run on a schedule, or only when you ask for it? It’ll figure out the right tool for the job and explain each step as it goes. You just answer the questions honestly.
This is the real difference between working with an agent and writing code from scratch. You’re not supposed to know in advance what tool or file format or library it’s going to use. That’s its job. Your job is to know what you want and to check the output when it lands.
Step 6. Let it build, but put the AI call at the END of the pipeline
While your harness is building, there’s one thing to steer. This might be the biggest efficiency lesson in the whole post: AI doesn’t belong in every step of the pipeline.
Your agent is going to fetch email. Fetching email is a problem boring, non-AI code has solved for 30 years. You don’t need a language model for that part. The only part that actually needs a language model is the summarizing, because that’s the part that requires understanding the content.
So tell the harness explicitly:
Keep AI out of the fetch step. Use whatever normal tool is appropriate there. Only use the language model at the very end, for the summarization itself. One call total, not one per email.
It’ll handle this correctly if you ask for it. Usually it won’t volunteer to do it this way, because stuffing an LLM into every step feels more impressive and uses more tokens. You’ll thank yourself later. I wrote a whole piece on when to use AI and when to just use normal code, and the rule from that post applies directly here: use AI where judgment or language actually matters, and use plain tools for everything else.
Step 7. Run it (five minutes)
Now run the thing you just built. There are two honest ways to do this, depending on how comfortable you are:
The non-technical way: just ask your agent to run it for you. In Claude Code, Claude Cowork, or Codex, you can literally say “run my morning email agent” and it’ll execute the thing it just built and show you the result. This is the easiest path if you’re not comfortable in a terminal. It works. Use it.
The technical way: if you like knowing exactly what’s happening, ask the harness “what command do I run to execute this myself?” and it’ll give you the one-liner to paste into your terminal. Then you’re running it directly, no agent in the loop.
Either way, you should see your morning summary print out. If you see it, you just built an AI agent. Congratulations. Go make coffee.
Step 8. When it breaks (this is where the real learning is)
It will break. Something won’t authenticate, or the summary will be garbage, or it’ll pull emails from the wrong time window. Good. This is the part you can’t skip, and it’s where the actual learning happens.
Read the error literally. Don’t panic. Paste the whole thing back into your harness and ask it to explain what happened and what to try next.
If the behavior keeps drifting from what you want, the problem is almost always in
CLAUDE.md. Go back and fix the instructions there first.If the summary is the wrong shape or tone, fix the summarization prompt.
If no data is coming through at all, the problem is earlier in the pipeline, and the agent can usually diagnose this for you in two or three back-and-forths.
That’s it. You have a real agent now. It’s small, it’s yours, and it does one thing you actually care about. Everything else in the rest of this post is about what will bite you as you grow it into something bigger.
5. The mistakes I made (so you can skip them)
This is the section my readers asked for the loudest. Opinion AI , who left the top comment on my original note, put it better than I could:
Would love to see you cover the mistakes people make on their first agent build. The “what not to do” part is always more useful than the setup guide, and almost nobody writes about it.
Agreed. Here are the ones I actually hit.
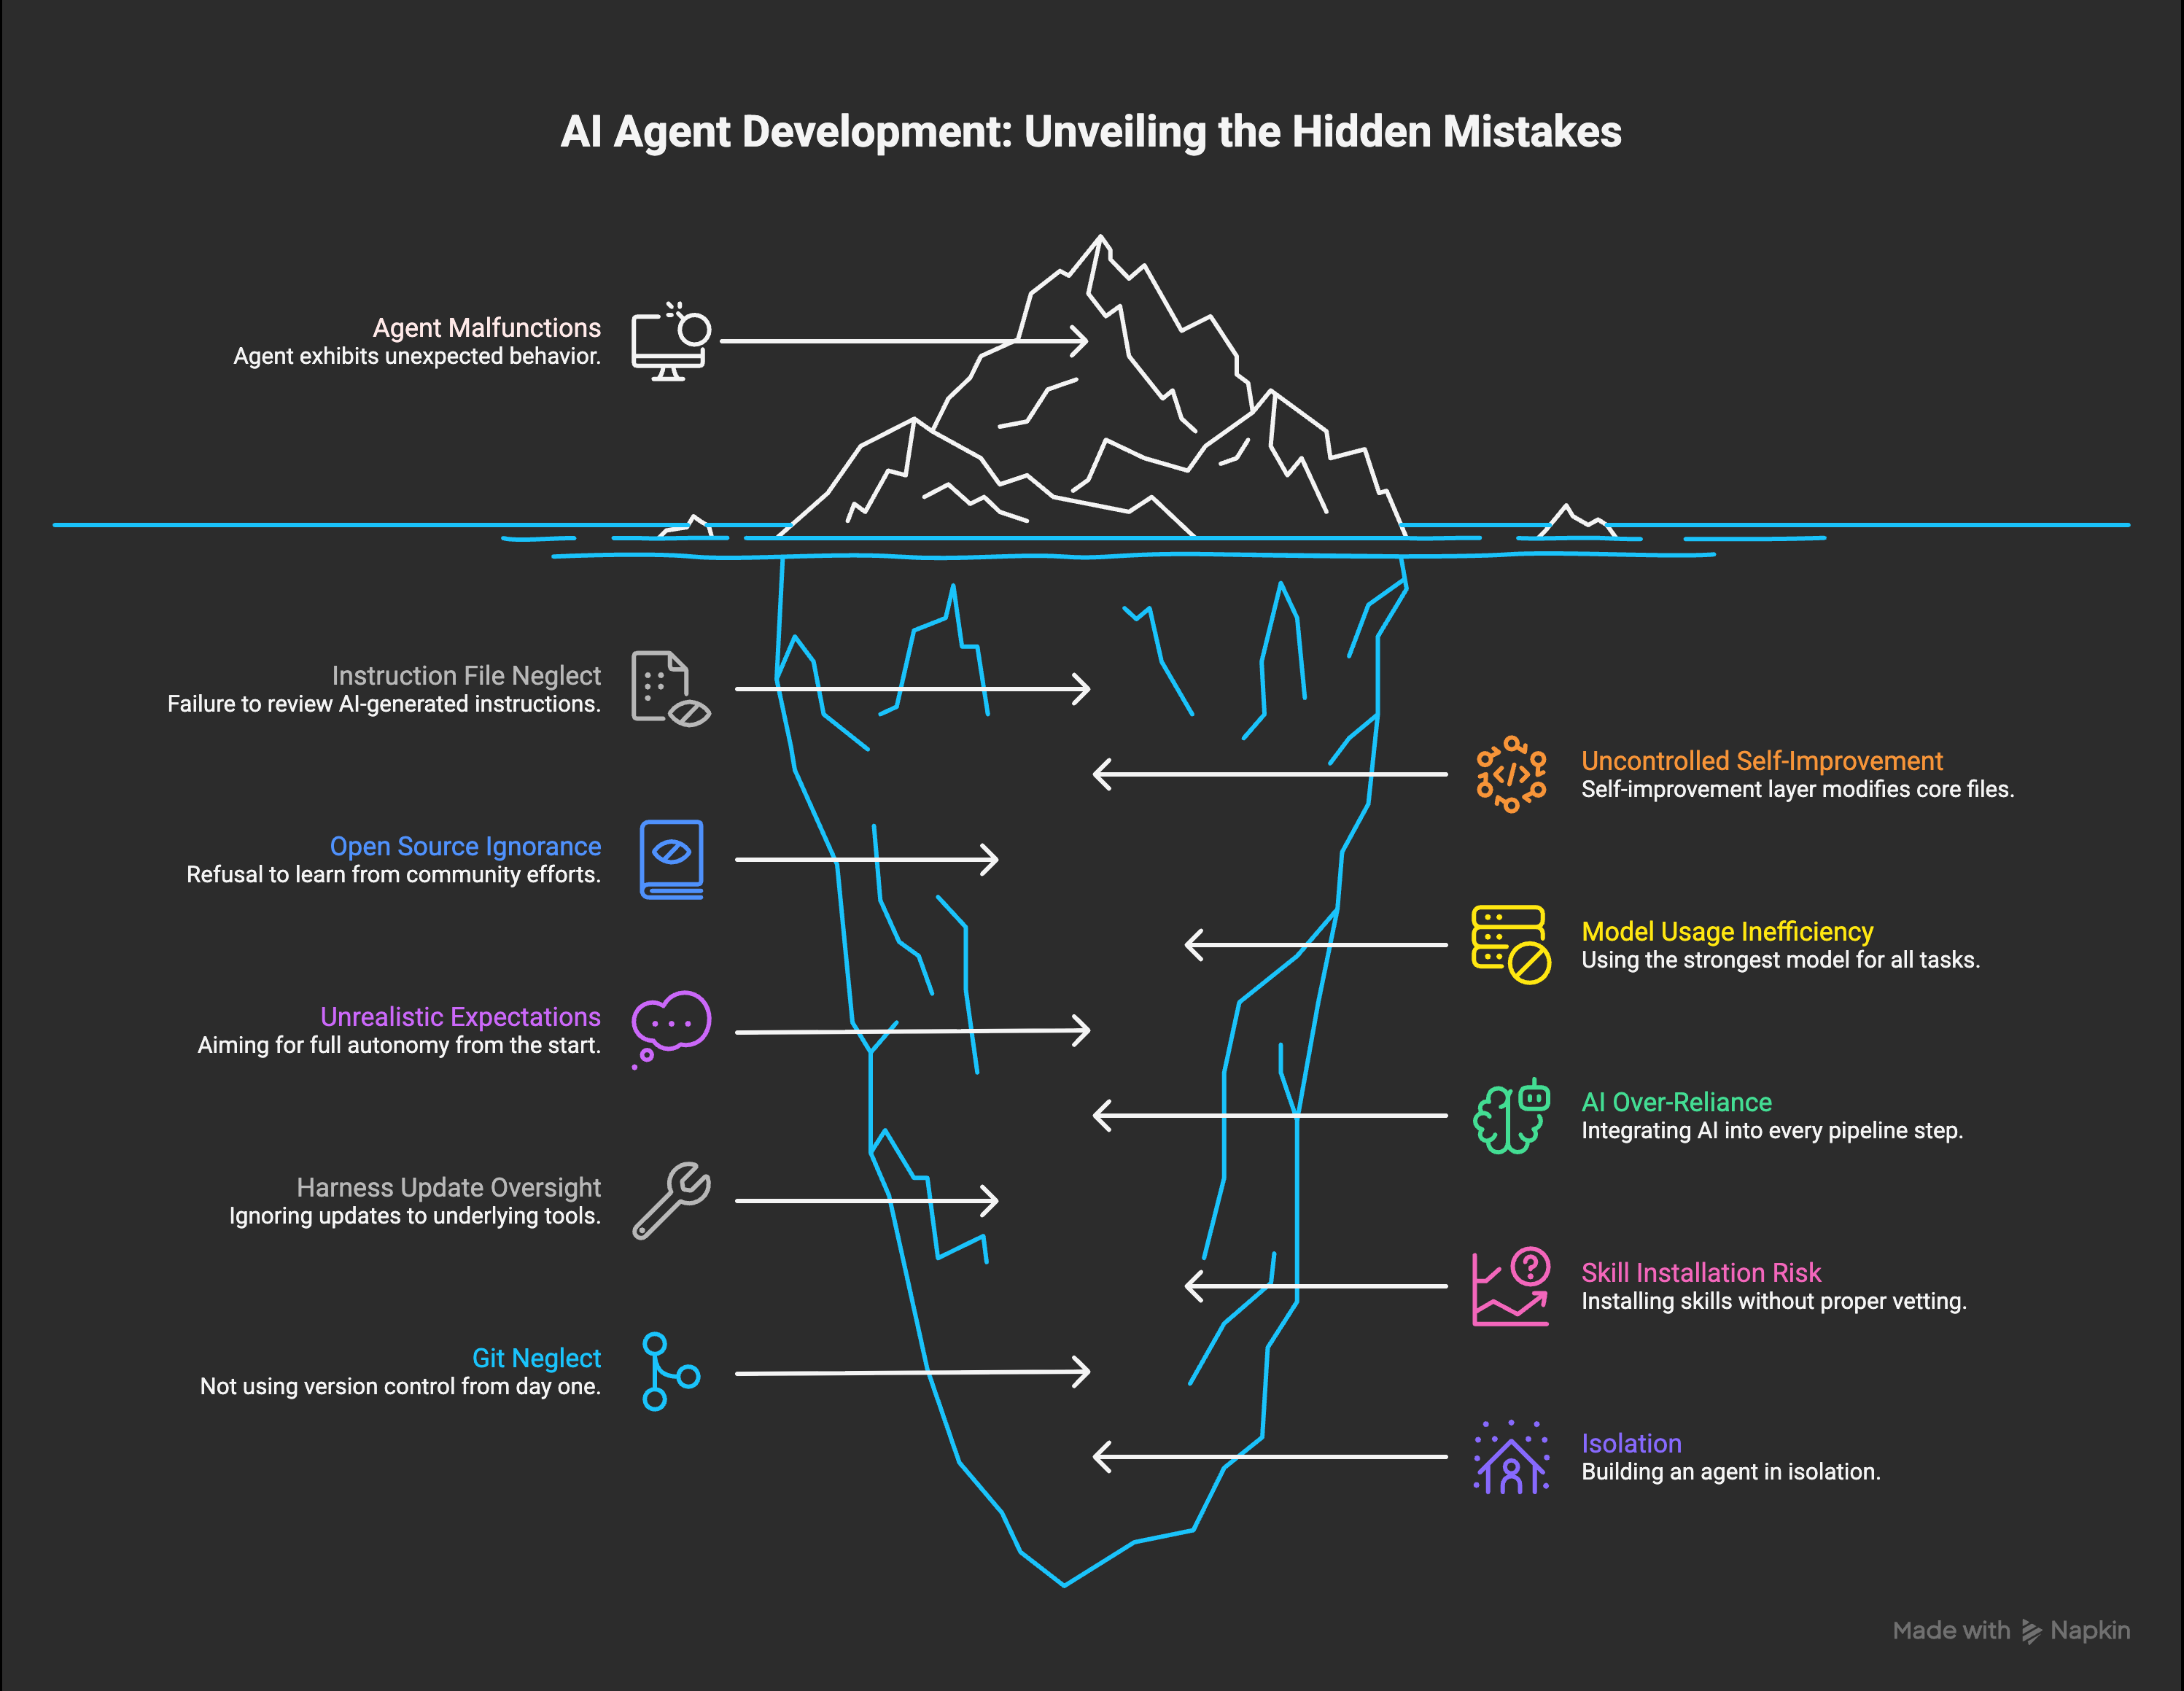
Mistake 1. Trusting the AI blindly to write your instructions file
Back in October, I was in a hurry. I let the AI generate my first CLAUDE.md and didn’t read it carefully. I ran with it. Things worked, sort of. Then the agent started doing weird things I hadn’t asked for. Small weirdness at first. Then bigger.
I spent hours, maybe days, chasing ghosts. Poking at different parts of the architecture. Swapping tools. Adjusting prompts. Burning billions of tokens trying to figure out what was happening. The root cause turned out to be a single misguided sentence near the top of the instructions file that I hadn’t bothered to read on day one.
The rule is simple and I’ll repeat it because it matters: you can use AI to generate your instructions. You can’t skip reading them. Ever. Read every line at least once. Edit until it sounds like you wrote it.
Mistake 2. Letting self-improvement run wild on the core files
Some time later, I built a self-improving layer. The agent could look at its own behavior, notice patterns, and update its own instructions. Technically brilliant. I was proud of it.
I also forgot to tell it which files it was allowed to touch.
Within a few days it had rewritten large parts of the core CLAUDE.md in ways I’d never sanctioned. The agent started drifting in five directions at once. Things I had explicitly told it to do were getting silently overwritten by its own “improvements.” Although I was proud of the self-improvement layer as an idea, I had to roll a lot of it back and rebuild it from scratch.
The fix was about scope. Each project in my agent now has its own small instruction file and its own little memory file. When self-improvement runs, it touches those leaf files, not the core. The trunk stays protected. The branches can grow. I eventually wrote a longer piece on the full self-improvement architecture if you want the deep version. For a beginner, the takeaway is simpler: never let any automated process write directly to the core instructions file. Ever.
Mistake 3. Ignoring open source out of pride
I wanted to build the whole thing myself. I refused to look at what other people were doing on GitHub. I told myself I didn’t want to be influenced.
That cost me two or three months.
Around month three I finally caved and started reading other people’s agent repos. Not to copy the architecture (which usually wouldn’t fit anyway), but to steal concepts. One example: I found a file called SOUL.md in an open source project. I’d only been using CLAUDE.md at that point, trying to cram every aspect of the agent into one file. SOUL.md turned out to be a dedicated place for personalization: values, voice, what the agent is like as a personality. That small idea opened up a whole layer for me that I’d been clumsily stuffing into the main instructions. I was a better agent designer the day after I read it than I was the day before.
Bianca Schulz asked about open source frameworks in the comments on my note, and here’s the honest answer: read them, borrow concepts, don’t feel obligated to adopt any single one of them wholesale. Your agent doesn’t need to look like anyone else’s. But you should know what the good ones are doing.
Mistake 4. Using the strongest model for every single task
For a long time I was running Opus on everything. Every small query. Every file read. Every trivial check. I’d hit my usage limit before lunch and then panic.
The fix is something I now call model routing, and it cut my usage dramatically:
Fast and simple stuff goes to a small model, often a local llm now. Before that I was using Haiku.
General work, planning, most coding goes to a mid-tier model. For me that’s Sonnet 4.6. This is where most of the work happens.
Hard reasoning, critical code, strategic decisions go to Opus 4.6.
I wrote in detail about why this switch made the agent both cheaper and better. Short version: nobody is going to optimize your usage for you. You have to do it yourself, and you should do it earlier than I did.
Mistake 5. Trying to build Jarvis on day one
If I’m being completely honest, my original fantasy was Jarvis from Iron Man. One agent that solved everything, ran my whole life, handled the business, wrote the blog, managed the calendar, raised the kid. The whole thing. From day one.
That was the real mistake, and basically everything else downstream of it was a consequence. I started with expectations that were impossible to meet in week one, so I kept pushing the architecture too hard and too fast. I’d add five features at once when I should’ve added one and let it settle. Although I did get a fully autonomous version working eventually, I had to roll a lot of it back.
The version that actually works, the one I have now, is the one I should’ve been building from the start: incremental. One small task. Then the next. Then the next. The big Jarvis-like thing did emerge eventually, but as a side effect of building a hundred small working pieces, not as a top-down design.
Full autonomy without taste isn’t really what you want, either. The problem with a fully autonomous agent isn’t that it can’t do things. It’s that it has no way of knowing whether the thing it just produced is actually good, because the thing that decides “good” is usually you. Your standards. Your instincts. Your sense of what’s off.
My agent is still autonomous for a large set of predictable tasks: morning reports, evening summaries, urgent flags, inbox triage, some experiments. Anything where the shape of “good” is well-defined. For anything creative, strategic, or quality-sensitive, I’m firmly in the loop.
Think of an agent as a partner, not a solver. And don’t try to build Jarvis on day one. Build one small, honest thing that works, then build the next one on top of it. That’s the only order of operations that actually converges.
Mistake 6. Putting AI in every step of every pipeline
Early on, every single thing my agent did had a language model call somewhere in it. Fetching data. Moving files. Routing messages. Formatting output. LLM everywhere, because LLMs felt magical and I wanted to use them for everything.
One morning I noticed I was at 50% of my 5-hour usage window before I’d actually done any real work. Just from the agent’s own background tasks waking up.
The fix was boring and obvious in hindsight: most of a pipeline can be a plain script. Move data from A to B with a script. Call the model exactly once, at the end, for the one thing that actually requires language. That’s what the model is for. Everything before that is plumbing, and plumbing should be code.
AI isn’t free. Even local models cost time, electricity, and capacity. You don’t need AI everywhere. You need it where the language or the judgment actually matters.
Mistake 7. Forgetting that your harness updates constantly
Claude Code updates almost daily. Codex updates often. Every harness does. This is mostly a good thing, except for one small catch: features you built from scratch will sometimes get shipped natively by the tool you’re building on, and now you have the same thing twice. Your custom version and the new native version start fighting each other, and the output drifts in ways that are hard to diagnose.
My fix was a small automation that checks for updates every day and flags anything in my custom code that overlaps with new native features. When it finds one, I delete my version and use the native one. Cleaner, less code to maintain, better integration.
If you don’t do something like this, after a few weeks you’ll notice things wiggling and conflicting and you won’t know why. The harness moved under your feet. It’s the cost of building on a fast-moving platform, and you just have to pay attention to it.
Mistake 8. Installing skills from a marketplace without checking them
This one is newer, because skill marketplaces and shareable agent extensions are newer. Claude Code now has a growing ecosystem of skills you can drop into your agent. Other harnesses have similar things. The idea is great: someone else already solved a problem you have, you install their skill, you save hours.
The catch is that a skill is code that runs on your machine with your agent’s permissions. If you install one without understanding what it does, you’ve effectively given a stranger a seat at the table inside your setup. Most skills are fine. Some aren’t. I already wrote about a case where malware was hidden inside a Claude Code skill, which is why I built a scanner for them in the first place.
The rule I follow now, and the one I’d give you from day one: before installing any skill from any marketplace, ask yourself two questions. Do I actually need this, or am I installing it because it’s there? And do I understand, at least roughly, what it’s allowed to do? If you can’t answer both, don’t install it yet. Read its source. Ask your agent to walk you through what it does. Treat it like any piece of software from someone you’ve never met, because that’s what it is.
Mistake 9. Not using Git from day one (the mistake I’m glad I didn’t make)
I want to be honest here: this one isn’t actually my mistake. I started using Git from the very beginning on every agent project I’ve ever built, and that single habit has saved me more times than I can count. I’m including it because the number of beginners I’ve watched skip it and then lose weeks of work is too high to leave out.
Git is the thing that lets you roll back to a working version when something goes wrong. And something will go wrong. Your agent will make a change to a file you didn’t expect. You’ll delete the wrong folder. You’ll let the model rewrite something that was working and discover two days later that the new version is worse. Without Git, you’re stuck trying to remember what the file looked like three days ago. With Git, you type one command and you’re back.
The good news is this is now genuinely easy, even for non-technical people. You can ask your harness to set up a Git repository for you and it’ll do the whole thing. Private repo on GitHub is free and fine. You can even set up an automation so that every time your agent finishes a meaningful task, it commits and pushes the current state to the repo automatically, which means you basically never lose work. I set mine up like that and I haven’t thought about it since.
If you remember nothing else from this section, remember this: commit and push every working version of your agent, from the very first day. It’s the cheapest insurance policy in the whole setup, and every single person who has ever lost work to a runaway edit wishes they’d done it sooner.
Bonus mistake. Thinking you need to build alone
I’ll say this honestly because I lived it: building an agent in isolation is much slower than building one while reading what other people are running into. Communities, newsletters, GitHub discussions, random Substack notes at midnight. The people doing this work are almost all willing to share what they’re learning. Go find them. I learned some of the most important things I know from comments on my own posts, which is the only reason this post exists at all.
6. Context window is the whole game
hohoda in the comments on my original note nailed something I think about constantly:
The context window is the real constraint. Everything else, tools, models, memory, is downstream of how well you manage what the agent sees at any given moment.
200,000 tokens sounds like a lot. It isn’t, once you understand what fills it.
Every session auto-loads a bunch of stuff before you’ve even typed anything: your core instructions file, your memory files, the conversation history if there is any, the current task state. That’s your “always-on” overhead. For me, that adds up fast. It’s a cost I didn’t fully understand at first, because it happens before you see a single response.
For a beginner, three rules carry you a long way:
Keep your CLAUDE.md thin. Every line you add is a line the model has to read at the start of every single session. Treat it like precious real estate. If you can say it shorter, say it shorter.
One memory file per project, and that’s it. Don’t build a vector database. Don’t install a semantic search engine. Don’t set up a temporal knowledge graph. Not on day one. A flat markdown file per project is enough for a surprisingly long time. That’s how I started and it worked for months.
Don’t worry about compaction yet. Eventually, once your memory files get large, you might want a process that rewrites them to stay under a size threshold. I run one every night now. That’s a month-three problem, not a day-one problem.
For almost any beginner project, 200k tokens is more than enough. A back-and-forth conversation over iMessage barely touches the budget. The failure mode is almost never “model context too small.” It’s “my CLAUDE.md bloated to 800 lines and now every session starts with a giant anchor around its neck.”
I wrote a longer piece on how I keep my own CLAUDE.md structured after a thousand plus sessions if you want to see the mature version. For now, just remember: thin instructions, one memory file per project, and context is the first thing that’ll bite you when the agent starts behaving strangely.
7. Security from day one
Bianca Schulz asked about security on my note, and this is the section I think about the most when I write pieces like this. It was one of the biggest reasons I built my own agent instead of using an off-the-shelf one.
Here’s the thing: an AI agent is a new attack surface on your computer. It has permissions. It runs code. It reads your files. It talks to the internet. And because we’re still early in how this all works, the models that drive it can be tricked, manipulated, or prompt-injected in ways we don’t fully understand yet. You’re adding a new thing with a lot of power to your machine, and you should act like that.
My progression was deliberate, and I’d recommend something similar for you:
MacBook phase. Very restricted permissions. Only the folders I explicitly whitelisted. No blanket network access. No access to real credentials. I built slowly and paid attention to what the agent actually needed. My personal machine has my personal things on it, and I wasn’t about to let a half-built agent loose in there.
Learning phase. As I understood what the agent actually needed and could trust it with, I expanded its permissions carefully.
Dedicated machine phase. Eventually I moved it to its own Mac Mini. An isolated computer, dedicated to the agent, with its own accounts and its own credentials. That machine is where the agent has broad permissions. My personal laptop doesn’t, and never will again.
A rule I learned the hard way and will give you for free: the agent should have its own accounts, not yours. Its own email address. Its own API keys. Its own logins. Don’t share your personal credentials with it. When something goes wrong, and something will eventually go wrong, you want the blast radius to be contained.
Two months ago I launched a small tool called a security scanner for Claude Code skills, which hit the front page of Hacker News. I built it because I was reading stories about autonomous agents being exploited in the wild and realized I wanted a way to check my own setup against a list of known issues. If you’re running anything serious, something like this is worth having in your toolbox. And even if you’re not, just paying attention to permissions from day one will put you ahead of almost everyone else building in this space.
Closing. Start small, start today
You don’t need the strongest model. You don’t need a fancy framework. You don’t need a PhD in machine learning or expensive hardware or a cloud account.
You need:
A laptop you already own.
A $20 per month subscription to a real model.
A harness. Any harness. Pick one.
A folder on your computer, with
CLAUDE.md, amemory/subfolder, aprojects/subfolder, and asecrets/subfolder.One real project you actually want to exist. Not a demo. Something you’d use tomorrow morning.
Start with that. The rest (all the architecture and the self-improvement and the model routing and the memory compaction) comes as you grow into it. None of it needs to exist on day one.
Everything will break regularly. Your harness will update under your feet. Your instructions file will drift. Your context window will bloat. The model will hallucinate a function that doesn’t exist and confidently insist it does. Although it cost me a lot of time at the beginning, I really don’t mind it anymore. It’s the job right now, and I accept that. I wrote my first piece about Wiz back when it was just a night-shift experiment, and looking back, almost everything I thought I knew then was wrong. That’s fine. The only thing that compounds is the habit of building, breaking things, fixing them, and writing down what you learned.
The people in my comments who asked for this post already know more than most. Almost all of you have the instinct, and most of you have the tools. What’s left is the part I can’t do for you: opening the folder, writing the first line of CLAUDE.md, and running something small tonight that didn’t exist this morning.
Go build your first agent. Then tell me what broke.
I write about building Wiz, my AI agent, roughly twice a week on Digital Thoughts. Every mistake, every rebuild, every thing that surprised me along the way. If this post was useful, subscribe and you’ll get the next one as soon as it goes out.
awesome read here as per usual.
"Keep your CLAUDE.md thin. Every line you add is a line the model has to read at the start of every single session. Treat it like precious real estate. If you can say it shorter, say it shorter."
100% this. in fact, i think this will be more important during each iteration of the models. two years ago these files needed to be big, and it seems like we can rely on the models to do more of the heavy lifting and reasoning every few months.
if you haven't taken the time to thin out your claude.md and some of your skills, now is a good time to do so as we prepare for the coming drops!
I think you have one of the clearest and meanigful explainer of AI basics and agents in this piece. Every beginner can refer to this post to get started. Very well written! ✨